Jira Server (Data Center)
Create New Exploratory Test
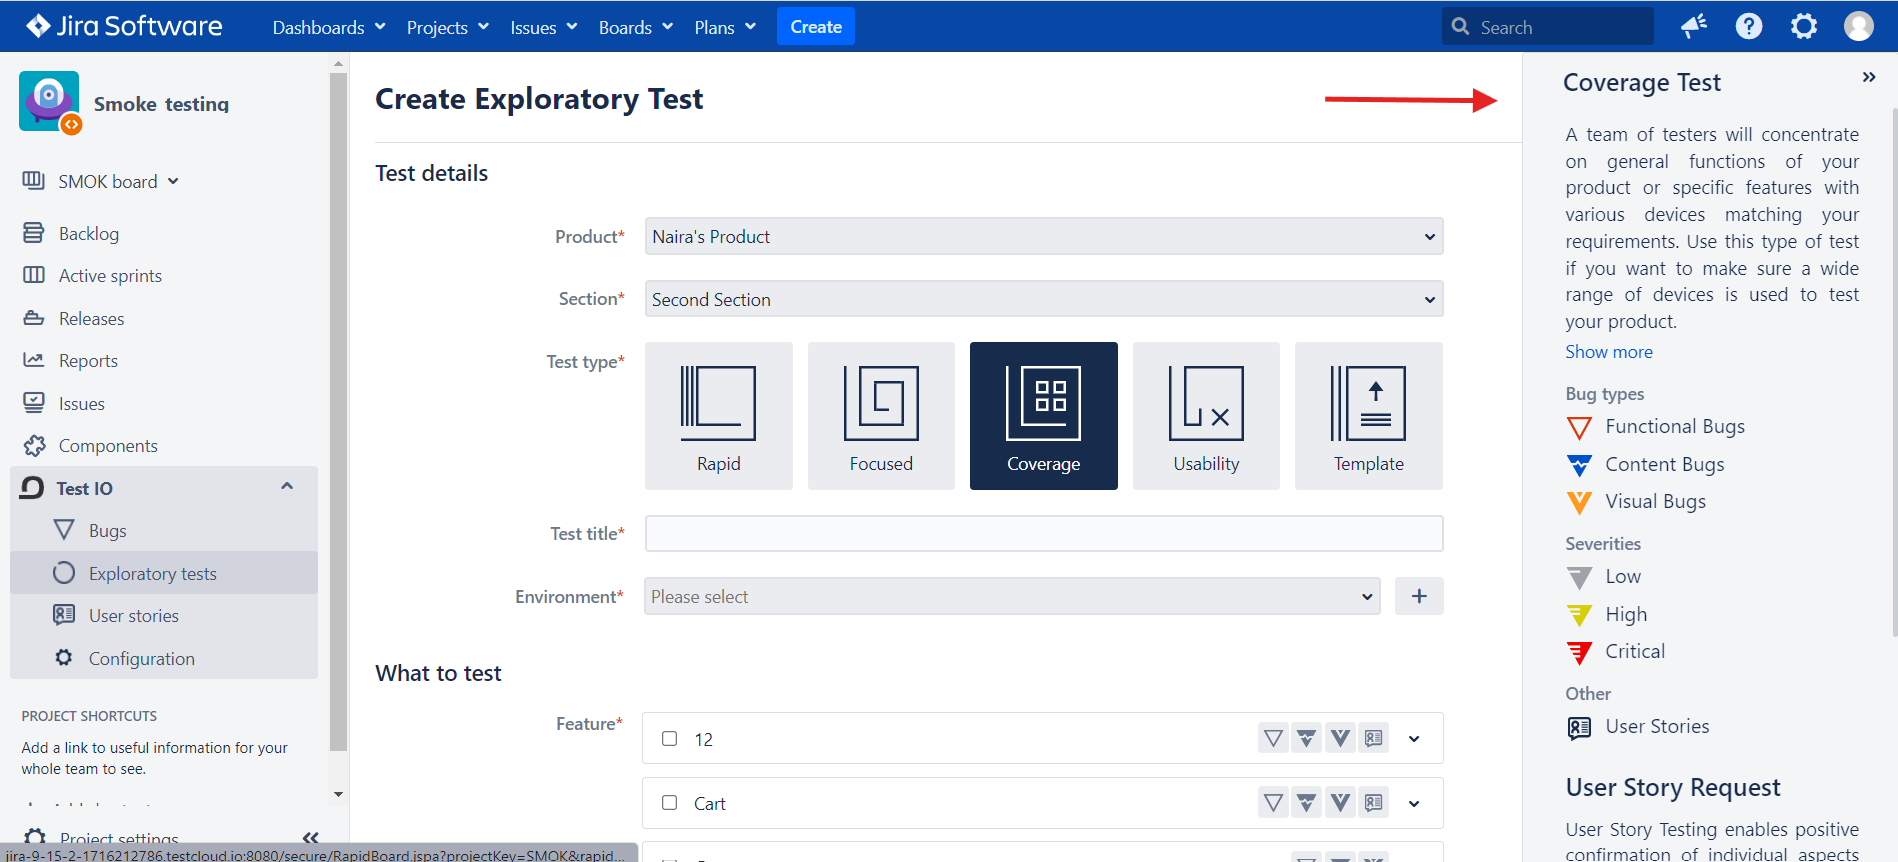
You can access the "Create Exploratory Test" page by clicking the "Create new test" button on the Test IO -> Exploratory Tests page.

Follow the steps below to create a new Exploratory Test within your Jira Plugin:
Step 1: Select Test IO Product and Product Section
To send your test to the appropriate Test IO Product, follow these steps:
- Select the Test IO Product: From the dropdown menu, choose the specific Test IO Product you want to use for your test.
- Select the Product Section (if applicable): If the chosen Test IO Product has different sections, select the relevant Product Section from the dropdown menu.

These dropdown options are based on the configurations set up in the Jira Data Center (Server) Plugin, ensuring that your test is properly linked to the correct Test IO Product in your Jira project.
Step 2: Next, select the type of test you will be running
For this example, choose "Coverage."

After selecting the test type, a panel on the right side is expanded to display details about the chosen test type, including allowed bug types and severities, user story testing, and its available balance (depending on your customer pricing plan).
You also have the option to create a new Exploratory Test by utilizing existing templates saved on the Test IO platform. To streamline the test creation process, simply click on "Templates" under the Test Type section, select the template that best suits your needs, and proceed with the setup. This approach enables a faster and more efficient test initiation, ensuring consistency with well-established frameworks.
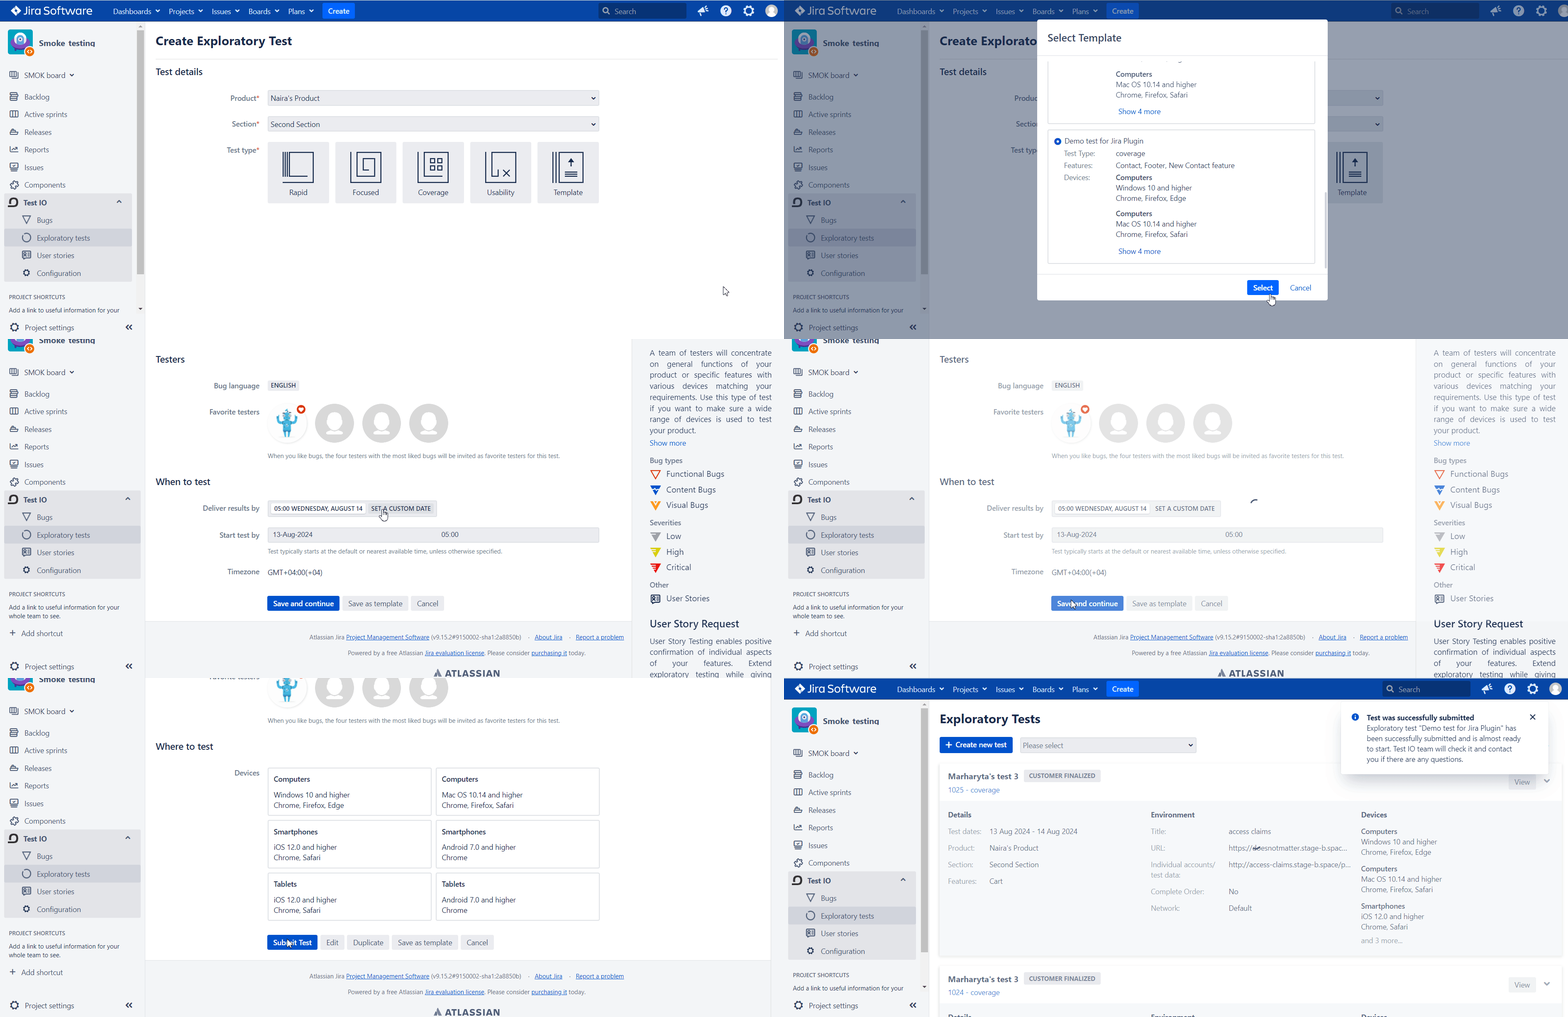
Step 3: Enter a Test Title
Provide a clear and descriptive title for your test.

Step 4: Specify the Test Environment
From the dropdown menu, select the environment you want testers to use. This menu shows the existing environments available on Test IO.

If the needed environment is not listed, create a new one by clicking the “+” icon next to the dropdown.
To create a new environment:
Title: Provide a name for the new environment.
Type: Select whether the environment is a URL or a file upload.
Details: Enter the URL or upload the file, based on your previous selection.
Credentials: Enter a Username and Password if required.
Instructions: Add any specific details or instructions for the testers.
Individual accounts/test data: Select from the following options to add individual test accounts to the test environment:
- No: No individual test data will be provided.
- Page URL: Provide a link to a page or file that contains individual test data for the testers.
- Access Claims: Use the Test IO service to distribute individual login credentials, test data, or other testing information among the testers.
When selecting the Access Claims option, you can either choose from the available list in the dropdown menu or create a new access claims page by clicking the "Open/Create new access claims page" link. Find more details about Access Claims here.
Order Permissions: Check or uncheck the box to allow or disallow testers to complete orders.
Network Options: Choose either Proxy or Default for the network.
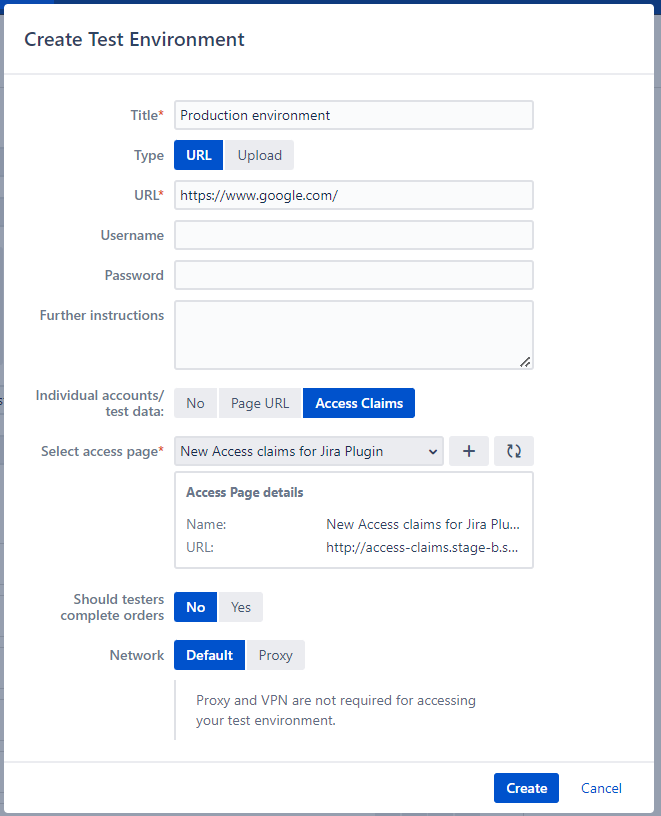
Once created, the new environment will be available in the dropdown list and added to the Test IO customer interface for future use.
Step 5: Select Features and Allowed Bug Severities
To ensure comprehensive test coverage, follow these steps to select the features and define the bug severity types for your test cycle:
- Select Features: Choose the features to be covered in this test cycle. At least one feature must be selected to run a test.
- Define Bug Severities: Mark the bug severity types allowed for submission by testers. You can select bug types by clicking on the corresponding icons or by expanding the Feature details and marking the checkboxes under the ‘Allowed bug severities’ section.
- Include User Stories: You can also include User Stories associated with the features to be tested. Click on the corresponding User Story icon for a specific feature or expand the feature details and pick the exact user stories to cover in the test.
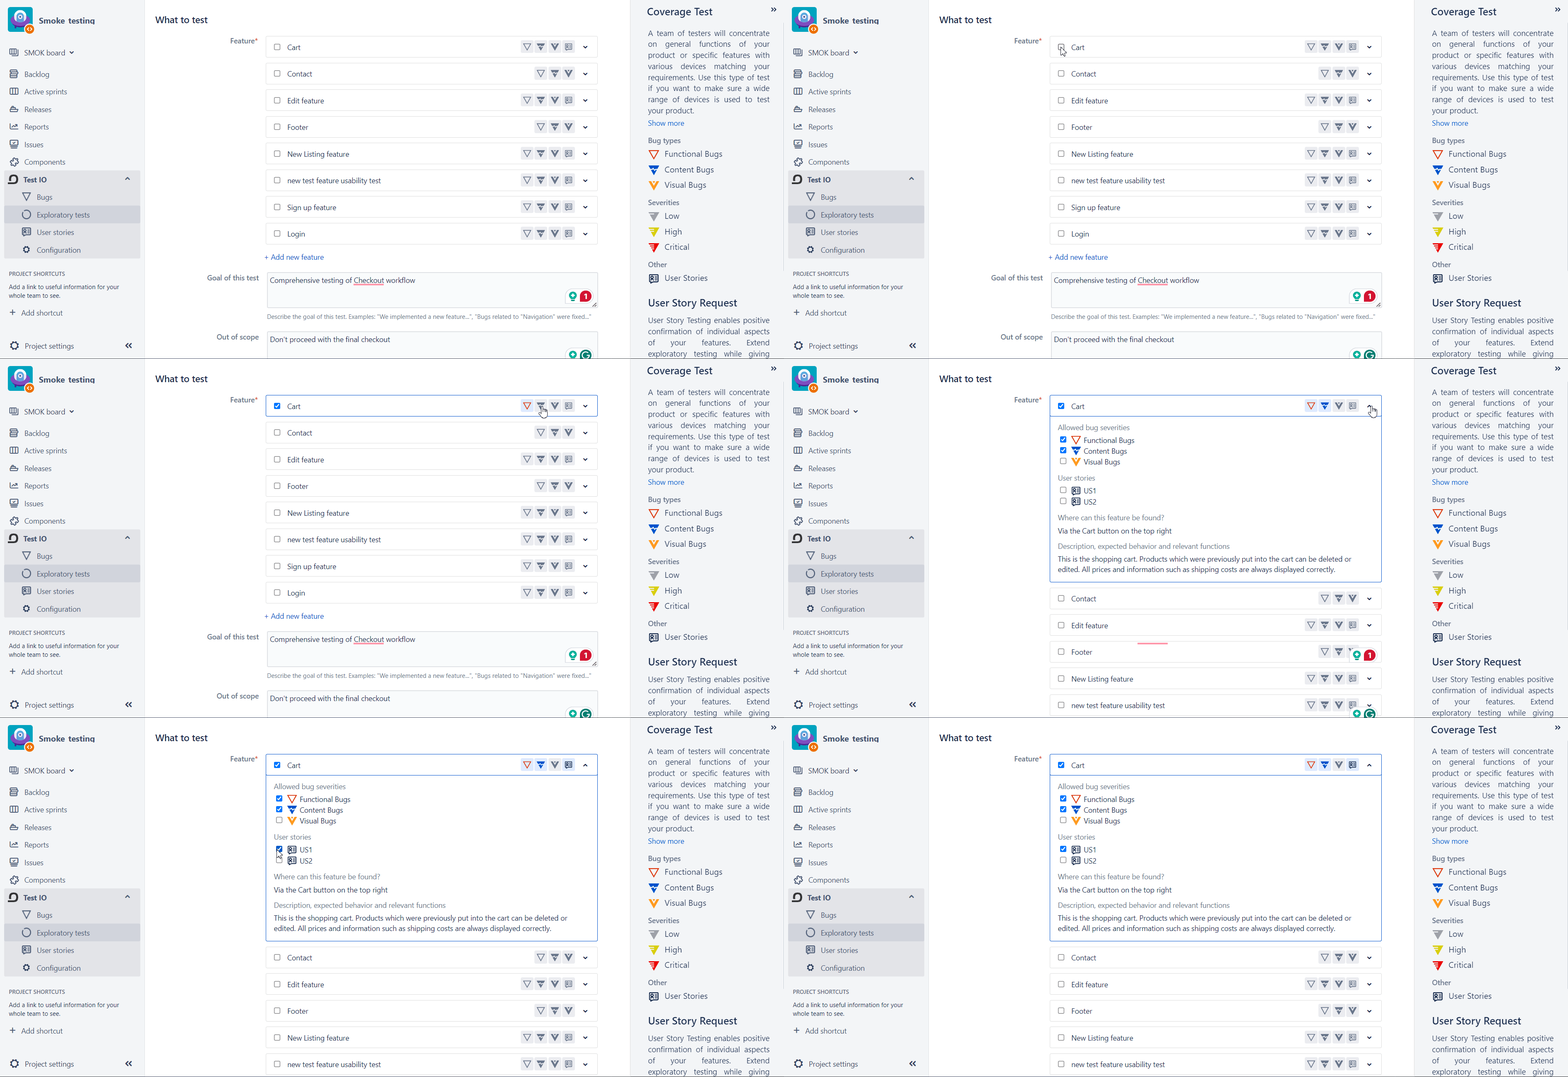
This approach ensures that your test is well-defined and covers the necessary aspects, providing clear instructions and expectations for the testers.
Additionally, you are not limited to the available list of features. To create a new feature and include it in your test, click on the "Add New Feature" button at the end of the existing features list.
Creating a New Feature:
- Specify a new feature name: Set a short name for this feature (e.g., Checkout, Navigation, Landing page).
- Provide a short description: Describe where this feature can be found.
- Define expected behavior and functions: Specify the expected functionality for this feature.
- Add User Stories: Include user stories for the feature if needed. To find more information on this, follow to the User Story Guide.
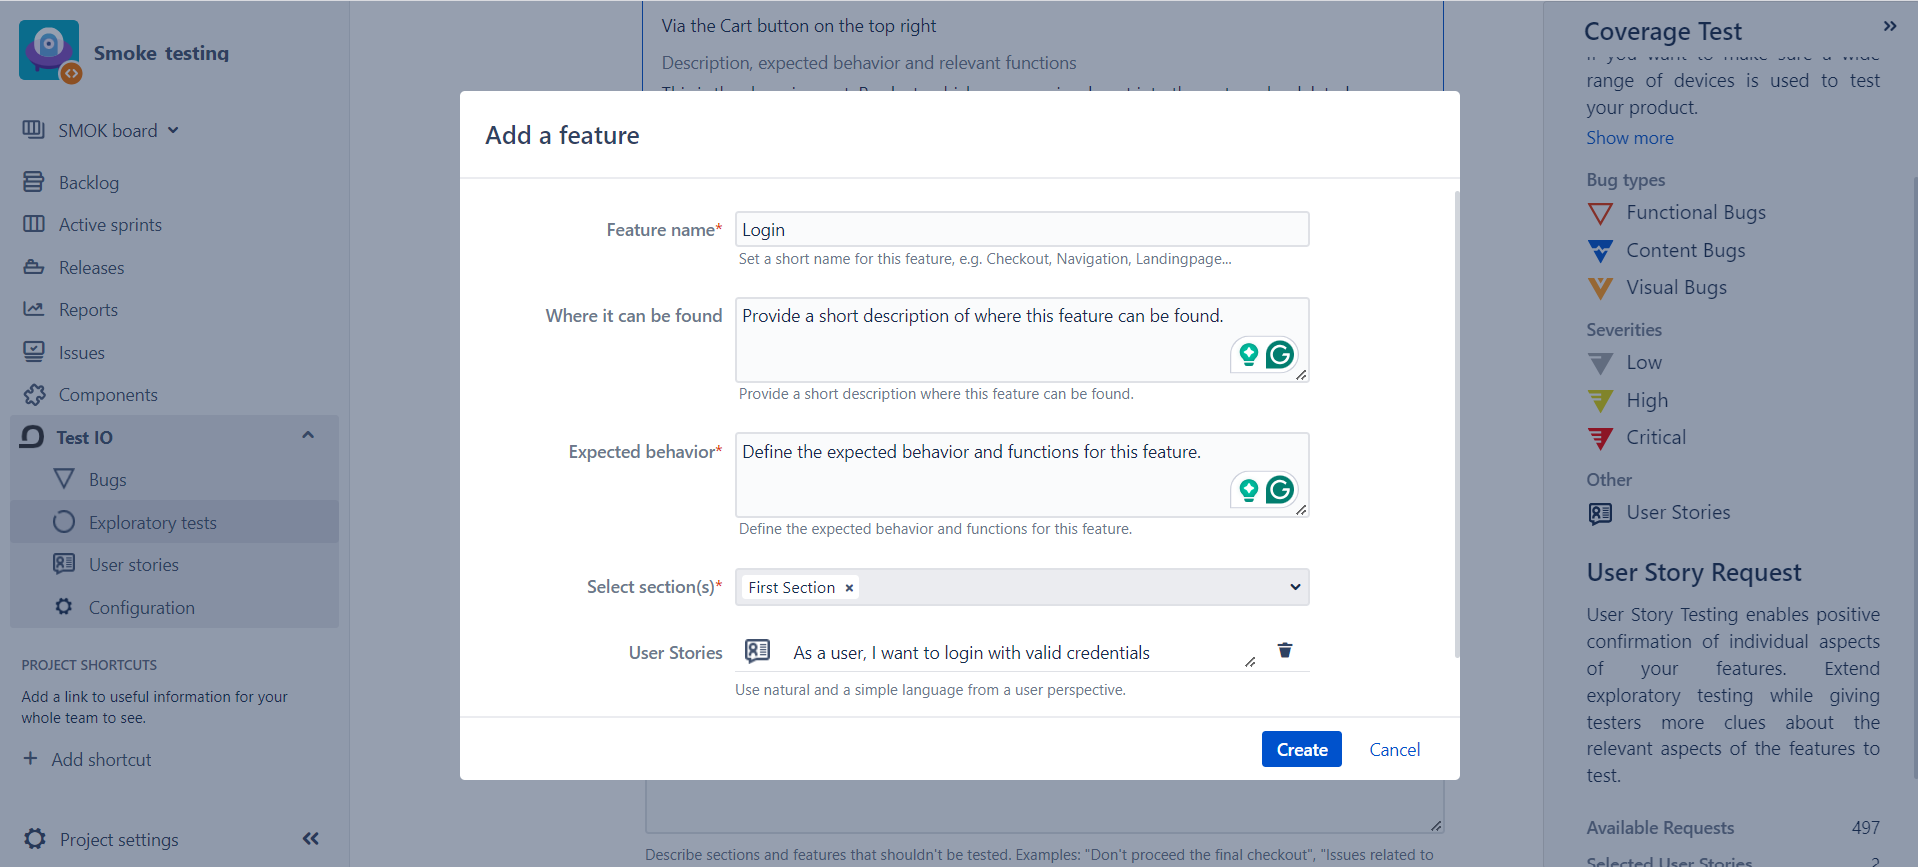
The newly created feature is added to the list on both the Jira and Test IO sides, ready for selection and testing.
Step 6: Define Test Instructions
The Instructions section is crucial for a successful test cycle.
Goal of the Test: This section should guide the testers. Define the desired results of the test and the information the testers need to discover these issues. Examples include the release of a new feature, a sanity test for "critical functional issues only," and changes to a common workflow. Keep in mind that test instructions are the only way for you to communicate your needs and expectations to a crowd of testers who might have never had experience with your site/platform/app before.
Out of Scope: Explicitly state any features or functionality out of scope for this test. Common examples include:
- Undesired functional severities or bug types.
- Steps testers should avoid (e.g., making final purchases, contacting support, sending out applications, etc.).
- Known issues in a given feature.
Additional Requirements: Provide any additional information testers should know to achieve the desired results. Examples include:
- Test accounts.
- Test payment information.
- Special requirements for environment access, bug report format, device usage, or access settings.
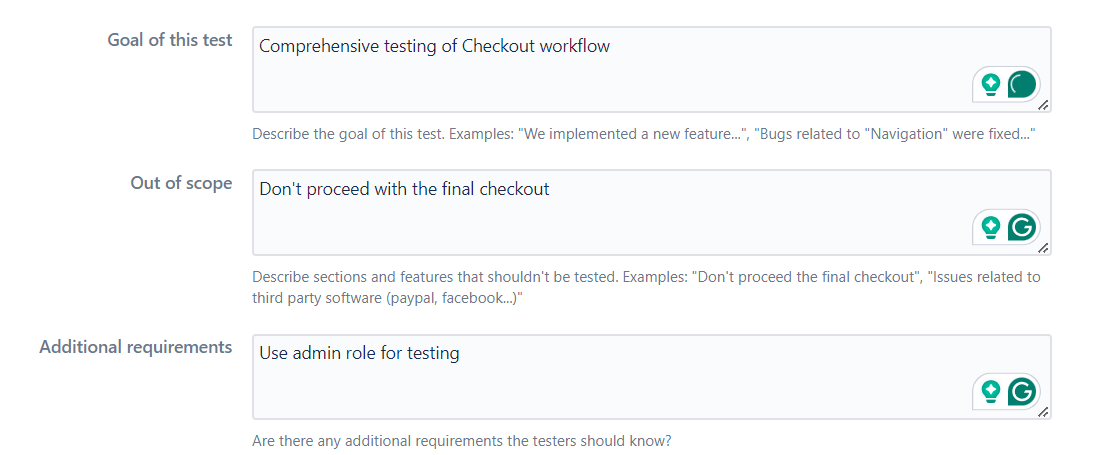
Lastly, we can include any attachments necessary for this test cycle (i.e. Excel documents, Mockups, Invision documents, screenshots, etc.).

Step 7: Specify "Where to Test" (Devices)
Choose the devices your testers will use to run your test. Default devices are suggested, but you can customize the selection at the test level.
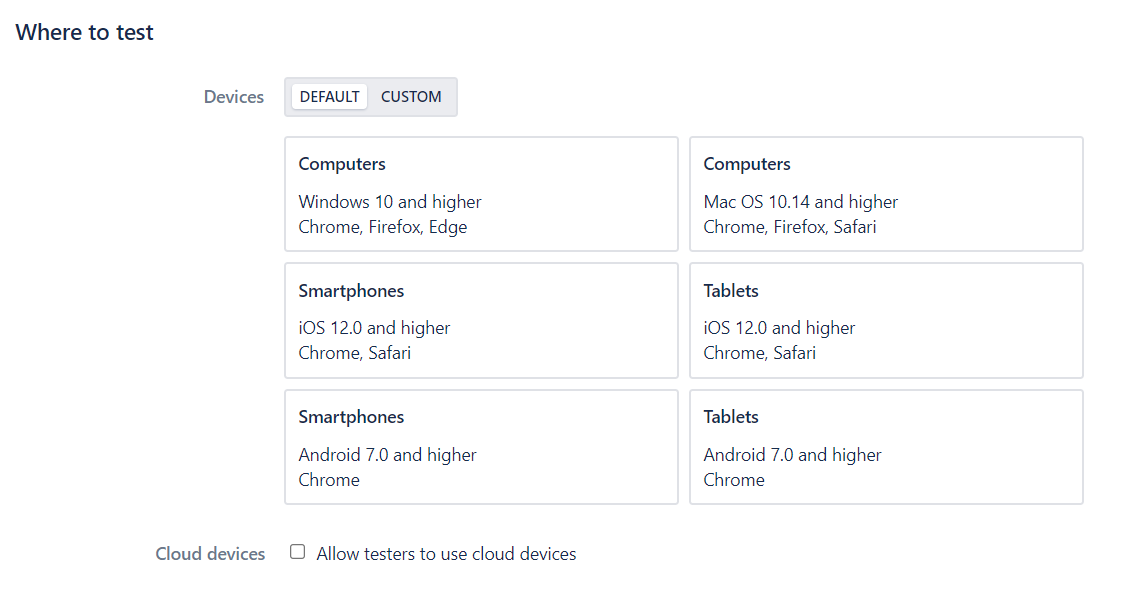
Defining the device scope includes editing device type, model, OS, and/or browsers. Edit device details or remove irrelevant ones under the Custom tab, or add a new device by clicking "Add Device".
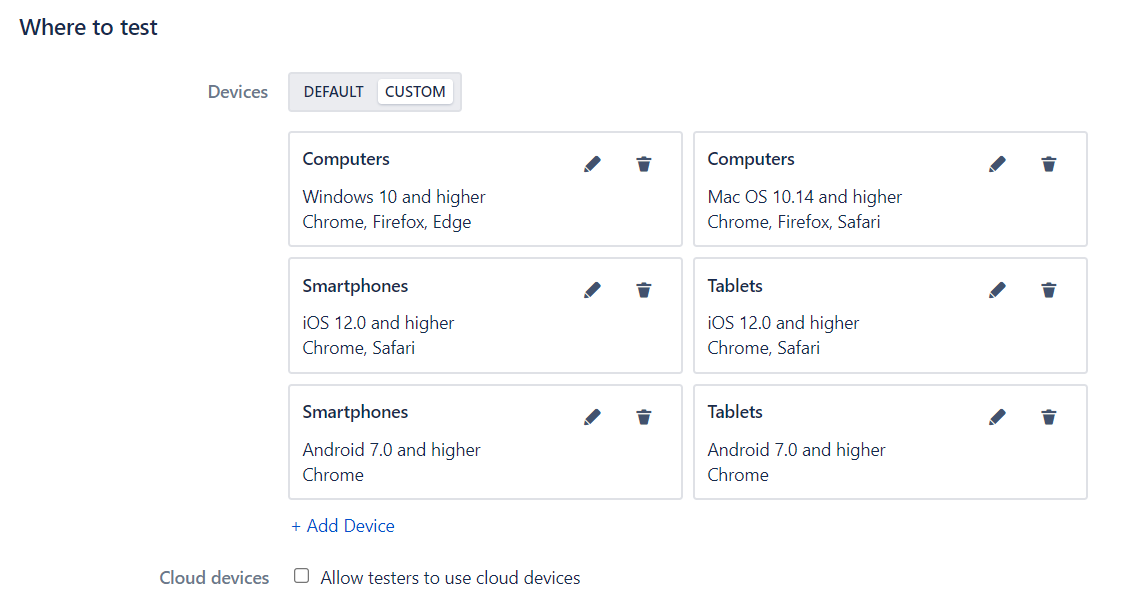
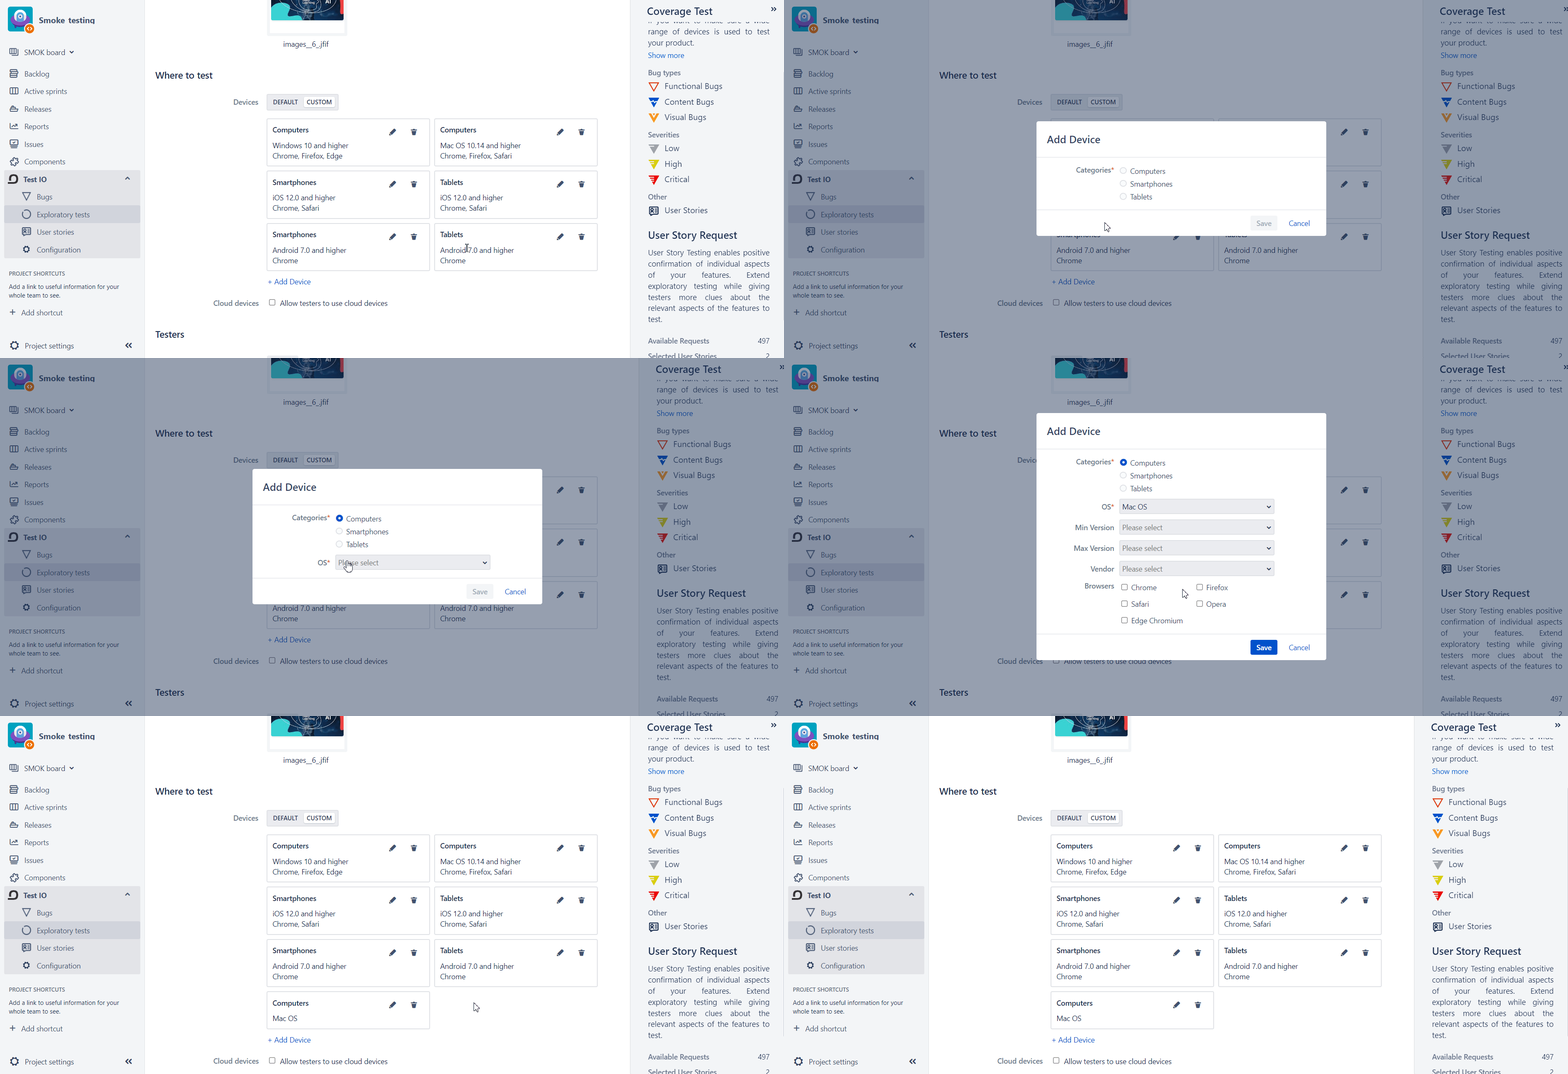
Additionally, you can choose to include Cloud devices for your test by marking the checkbox, allowing testers to use cloud devices.
Learn more about "Default Devices" and how to set them up here.
Note: Please consider that unconventional or outdated combinations may lead to irrelevant device-specific bugs.
Step 8: Testers
In the Testers section, you will find bug language information and a list of favorite testers. When you like bugs, the four testers with the most liked bugs will be invited as favorite testers for this test.
Step 9: Select Test Date and Start Time
Choose your desired test date and start time. For example, a Rapid Test set to begin at 4:00 pm on Tuesday, March 5th, should deliver results by 6:00 pm the same day.
To specify the date and time range for your test, you have two options:
- Earliest (Default) Date: This option allows your test to start at the next full hour +1 slot, as soon as possible.

- Custom Date and Time: Choose a specific date and time for your test to begin, providing more control over the scheduling to fit your needs.

Note: Due to our Team Lead review and invitation process on the Test IO side, the earliest a test can start is the next full hour +1 (e.g. current time: 9:40 am/test time: 11:00 am, current time: 5:05 pm/test time: 7:00 pm). Duration ranges vary based on Test Type, from two hours (Rapid Test) up to 48 hours.
Step 10: Click on “Save and continue”
Review the test details on the Test Preview page to ensure they meet your requirements.
Step 11: Submit the Test
Congratulations, you have successfully created your test! The Test IO team will review the test, and it will start on your specified date and time.
Test Setup Examples
On the Test IO side, we’ve created five test setup examples to illustrate the differences. Once you know what kind of test you're looking to run, you can use one of the below examples to guide your setup:
Received Bugs & All Bugs
Review Test IO Bugs from the configured Test IO Products and Sections
Accept Test IO Bug
Export Test IO Bug to your Jira Data Center (Server)
User Stories execution
Review the results of User Story executions included in your Tests